
A step-by-step tutorial on knitting brioche in two colors
Standard brioche knitting without increases and decreases is typically considered a nice pattern for beginners. It’s when you want to add further details that this popular knitting stitch pattern becomes very complicated. In this tutorial, I want to show you how to knit the brioche stitch in two colors the easy way.

I often feel that a lot of patterns and tutorials explain 2-colored brioche stitch with unnecessary knitting lingo that’s bound to be confusing for beginners. There are so many “barks” (brks) and “burps” (brp) littered around the pattern that it obfuscates the fact you basically just need three very simple beginner stitches. Let me show you what I mean.
Note: I earn a small commission for purchases made through links in this article.
Instructions: How to knit 2-colored brioche

The 2-colored brioche stitch is a 4-row repeat. Basically you knit each row twice. First, in the main color. Then, you slide the work back to the other end of the needle and work across one more time in a contrasting color. As a result, double-pointed or circular needles are a must.
Instructions
- Cast on an odd number of stitches using a longtail purl cast-on using your main color (MC). Consider casting on around two needles or using a bigger needle for a stretchier edge.

- Turn around and work one preparation row still using the MC: k1, *sl1yo, k1*, sl1yo k1
Note: this is going be the front side of your project.
- Slide the project back to the other end of the needle and join in your contrasting color (CC).

- Knit across the first real pattern row using the CC: sl1, *p2tog, sl1yo*, p2tog, sl1
- Turn your project around and switch to the MC (bring the yarn to the back if it's still in the front, as in the picture above).

- Work across using the MC: k1, *sl1yo, p2tog*, sl1yo, k1
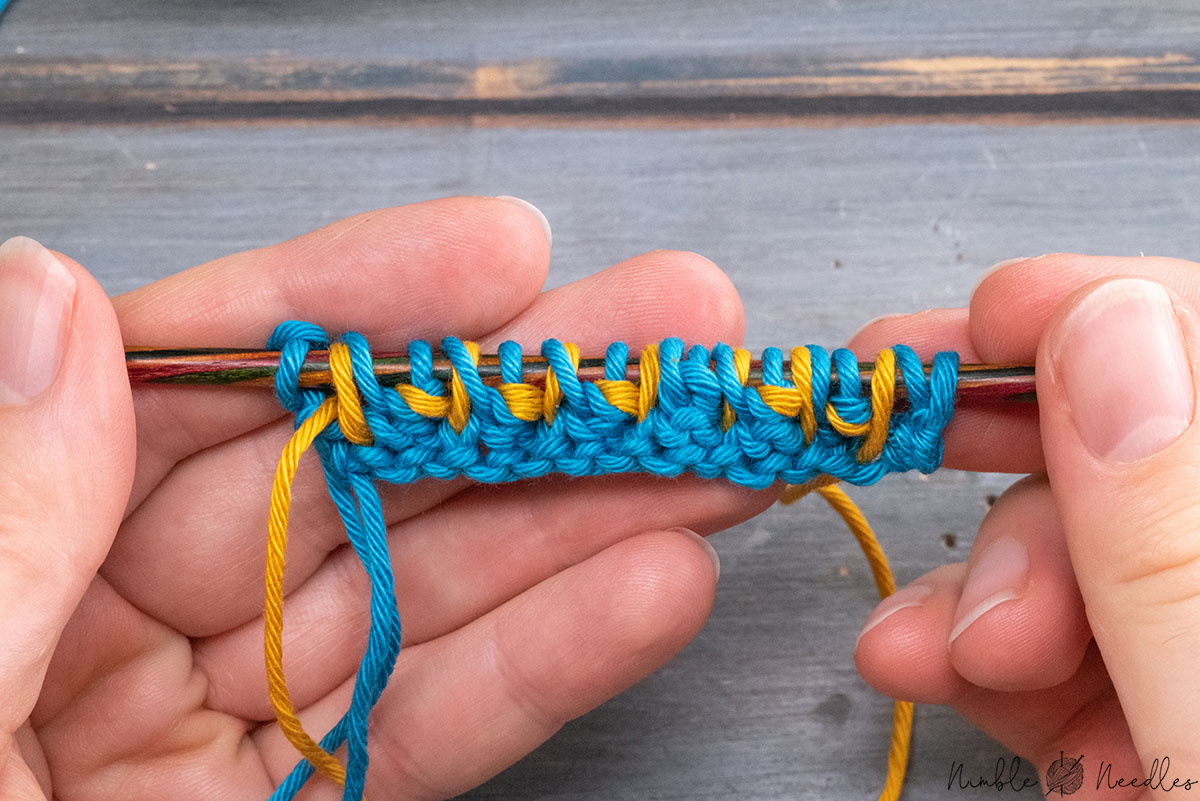
- Slide your knitting back to the other end of the needle and switch to the CC.

- Knit a row with the CC and the following repeat: sl1, *k2tog, sl1yo*, k2tog, sl1

- Turn your project around again and switch to the MC.

- Knit across with the MC and stick to this repeat: k1,*sl1yo, k2tog*, sl1yo, k1

- Repeat steps 3-10 until you've reached the desired length.

Notes
As normal with all types of brioche knitting, it will typically take quite a couple of rows until the pattern starts to emerge. After the first 4 or 5 rows, it will still all look quite wonky, almost like you made some mistake. So, be patient.
Also, be aware that I picked a garter stitch selvage using only the main color. Feel free to replace it with any other selvage stitch of your choice. However, I personally feel that, out of all the selvage stitches I ever tried out for 2-colored brioche knitting, garter stitch looks the cleanest and neatest.
It’s very important to understand that this is just one out of hundreds of ways to start and knit the two-colored brioche stitch. Personally, I feel it creates the neatest transitions all the way around while still not being overly complicated.
That being said, some people start on the backside using a standard long tail cast-on and then knit the preparation row using the contrasting color with *sl1yo, p1*). As a result, the repeat of the following rows needs to be adjusted accordingly. That’s why I feel it’s so important that you understand what brioche knitting is and how it works. Otherwise, you’ll be lost in your own pattern within seconds.
Understanding 2-colored brioche knitting

Now, at first glance, the repeat for the brioche stitch in two colors is quite exhaustive. Four rows and a preparation row? This sounds like you need to remember quite a lot. However, the contrary is true. You only need to remember four easy rules.
#1 You knit each row twice. Once with the main color. Then, you slide back and work across one more time using the contrasting color. Whenever two yarns are dangling down on the same side, you turn the work around. Whenever your two colors are dangling down on different ends, you slide the project back to the other end.
#2 Slip all single stitches purlwise and add a yarn over – no matter on which side you are and with which color you are currently working.
#3 If the next double stitch has a little “V” at its base, you bring the yarn to the back and knit it together (brk).

#4 If the next double stitch has a little “bump” at its base, you bring the yarn to the front and purl it together (brp).

You don’t need to memorize the repeat at all. Simply take a close look at what’s in front of you and knit accordingly. As a result, it really doesn’t matter how and why a brioche pattern starts a bit differently. Just copy that first row, and then read your knitting from there onwards.
The brioche stitch is a form of double knitting. But instead of using both colors simultaneously, you knit each row twice. First, you use the color for the front (main color) and slip all stitches for the back side. Then, you slide back and knit the stitches for the back side (the ones that you’ve previously slipped) using the contrasting color.
And the rest is super simple. If the ridges (the columns of Vs) have the same color as your currently active yarn, you can knit the double stitches together. If they haven’t, you need to work the ridges on the other side from the wrong side and purl them together.
This might also explain why so many people start 2-colored brioche differently. Here are some permuations.
- Start on the right side: Cast-on purlwise, then switch to CC and *sl1yo, p1*
- Start on the right side: Cast-on purlwise, continue with MC and *sl1yo, k1*
- Start on the wrong side: Cast-on knitwise (normal longtail), continue with MC and *p1, sl1yo*
- Start on the wrong side: cast on knitwise, switch to CC and *k1, sl1yo*
And depending on the kind of selvage you want to have/add, the order of the repeat (so *sl1yo,p1* or *p1, sl1yo* can be exchanged as well. However, these choices will ONLY influence the kind of edge you create at the bottom of your project. No matter how you start your project, you can always follow the 4 rules I mentioned above.
2-colored brioche stitch in the round
You can easily also adapt the repeat for knitting in the round. You can use double-pointed or circular needles and the magic loop technique – whatever you prefer. The best part is that there’s no sliding or switching between k2tog and p2tog. You simply need to switch between two easy rounds.
- Cast on an even number of stitches (MC)
- Round 1 (MC; preparation): *k1, sl1yo*
- Round 2 (CC): *sl1yo, p2tog*
- Round 3(MC): *k2tog, sl1yo*
- Continue switching between these two rounds until you’ve reached the desired length.
That’s already the full secret. It’s one of these rare stitches that’s actually a bit easier to knit in the round than flat, if you ask me. So definitely consider giving it a try.
So, that’s how to knit the brioche stitch in two colors. Comment below if you still have any questions.

Hi Norman,
I enjoy & continually learn a lot with your postings.
So… as I’m attempting to learn about knitting Brioche in the round. Note: I prefer the Video format.
That said, do you have any video of 2-Color Brioche knitting in the round? or I heard that their is a method to convert instructions from flat to round.
Thank you
Larry
PS: I’m also am a Patreon member
Hey larry,
no i don’t have one yet. sorry. I can put it on the list of things to record, tho.
Thank you so much for your clear teaching! I’m wondering if you have any articles or videos instructing how to convert a one-color, flat brioche pattern to two-color. That is, I’d like to work a one-color brioche pattern project as a two-color brioche project. Would you please direct me where to look? Thanks again!
– Joy
I am unsure where you think the differences would be? I mean, you have to do some juggling around but basically the only difference is that all return rows will be knit in the second color.
This is like a good Physics teacher teaching students how to reason instead of blindly learning formulae. Vielen dank.