
A step-by-step tutorial on brioche stitch knitting for beginners – in one color, two colors, or in the round.
The brioche stitch is one of my all-time favorite stitches. It’s fun and easy to knit. Plus, it creates a very voluminous and cuddly fabric perfect for scarves and other things to keep you warm in winter.

Before you start with this stitch, you should be familiar with casting on and casting off, the knit stitch, the purl stitch, knitting two together, yarn over, and slipping a stitch (you’ll find all the tutorials in my free knitting school). This sounds complicated, but trust me, it isn’t!

There are many amazing variations of the Brioche Stitch (I will show you the three most important ones in this tutorial). They all have one thing in common: They are all a combination of a slipped stitch and a yarn over. This double stitch is subsequently knitted together on the return row.
I am not sure why exactly it is called “brioche stitch”. But probably because the fluffiness reminded the creator of the equally fluffy French brioche dinner rolls (interestingly enough, in continental Europe, it’s typically referred to as “patent”). The best part: After one preparational row, it’s a one-row repeat pattern, so you really don’t need big charts or a good memory.

Note: I earn a small commission for purchases made through links in this article.
Instructions: How to knit the brioche stitch
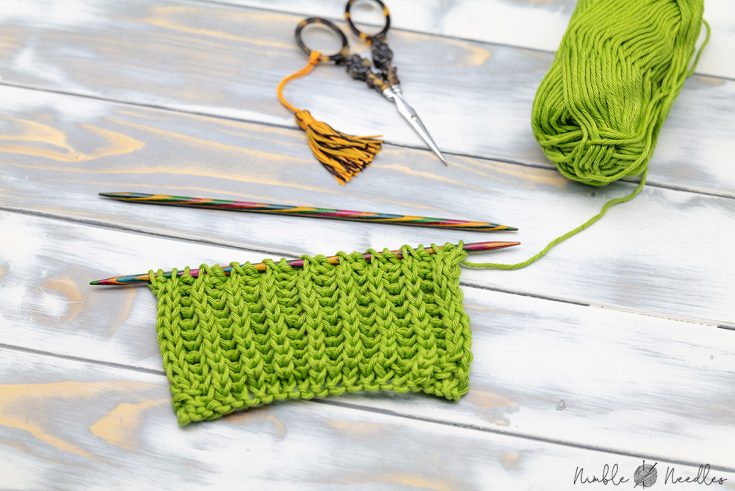
Step-by-step instructions for knitting the brioche stitch with an even number of stitches. Everything you need to know to master this easy 2-stitch repeat.
CO even number of stitches
R1: Sl1p wyib, *k1, sl1p wyif, yo*, k1
R2: Sl1p wyif, *k2tog, sl1p wyif, yo*, p1
R3: Sl1p wyib, *k2tog, sl1p wyif, yo*, k1tbl
Repeat rows 2+3
Instructions
- Cast on an even number of stitches as you like. Since the brioche stitch is very stretchy, I recommend casting on around two needles instead of just one.

- You need to knit one preparation row. Start by slipping the first stitch purlwise with yarn held in back.

- Knit the second stitch.
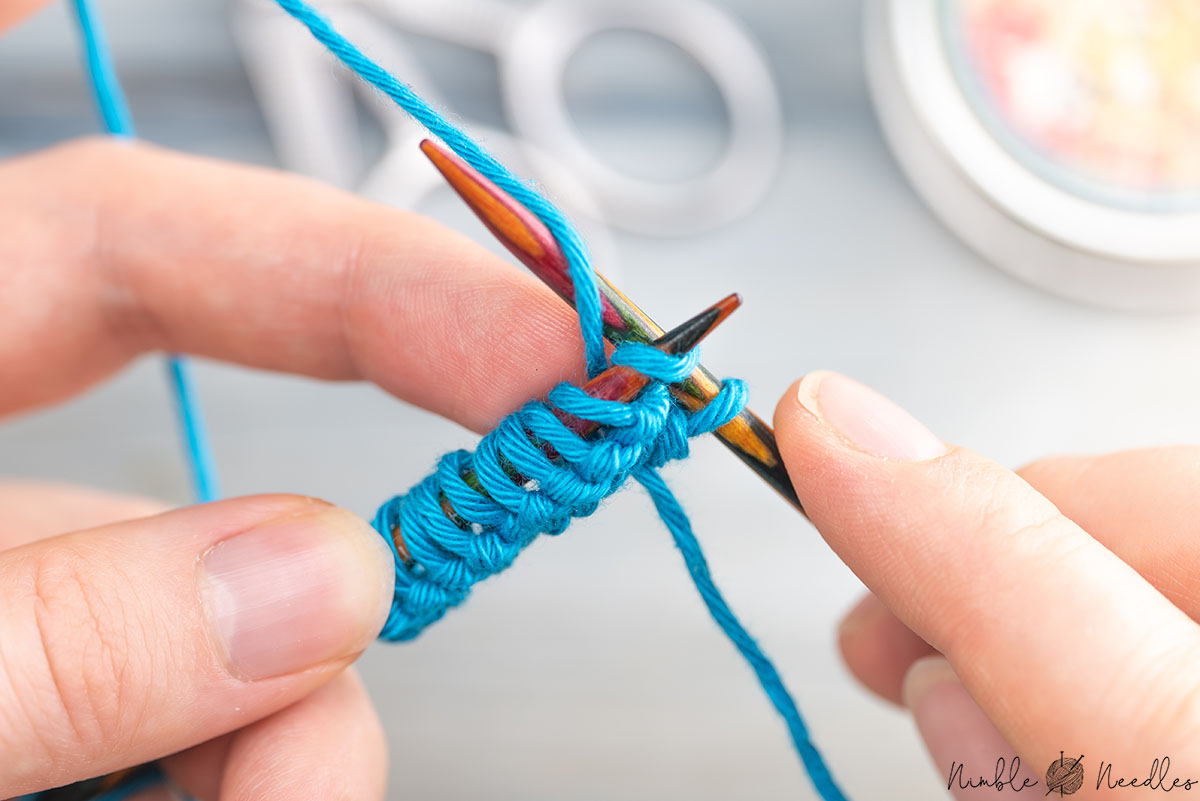
- Slip the next stitch purlwise with the yarn held in front.
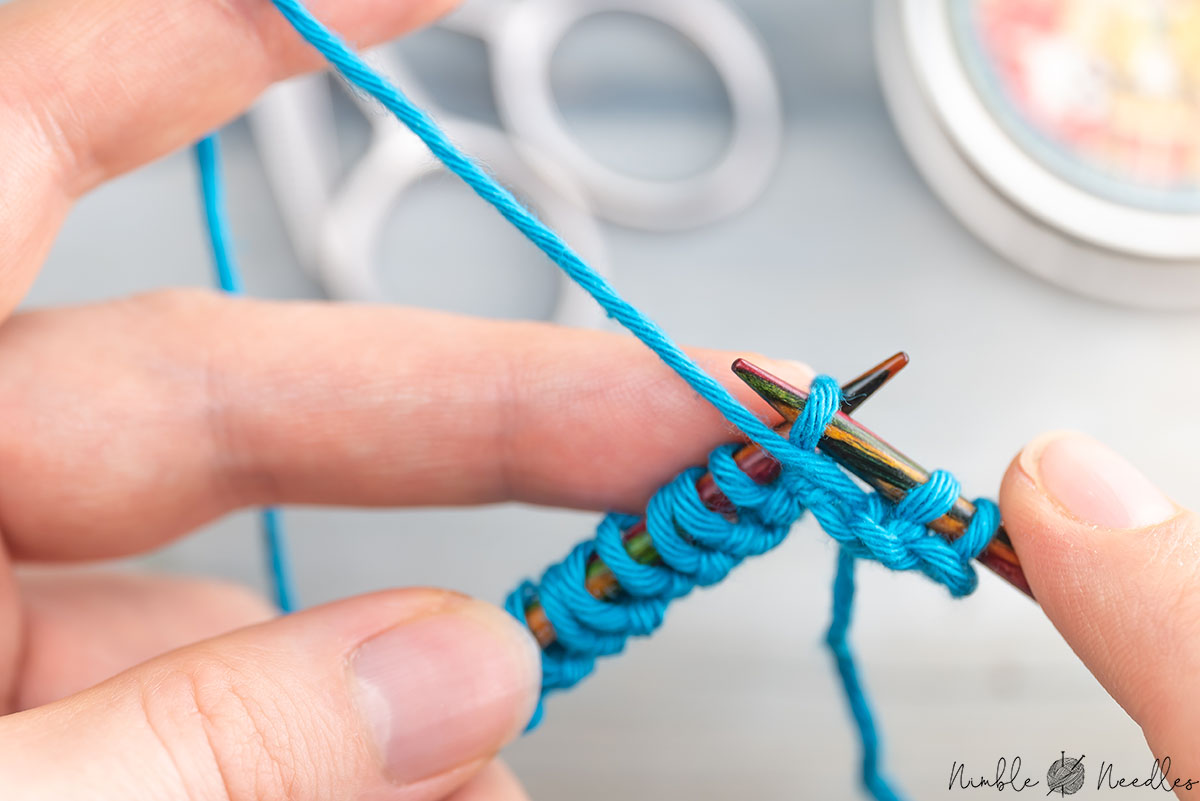
- Then add a yarn over on top of/after the slipped stitch.
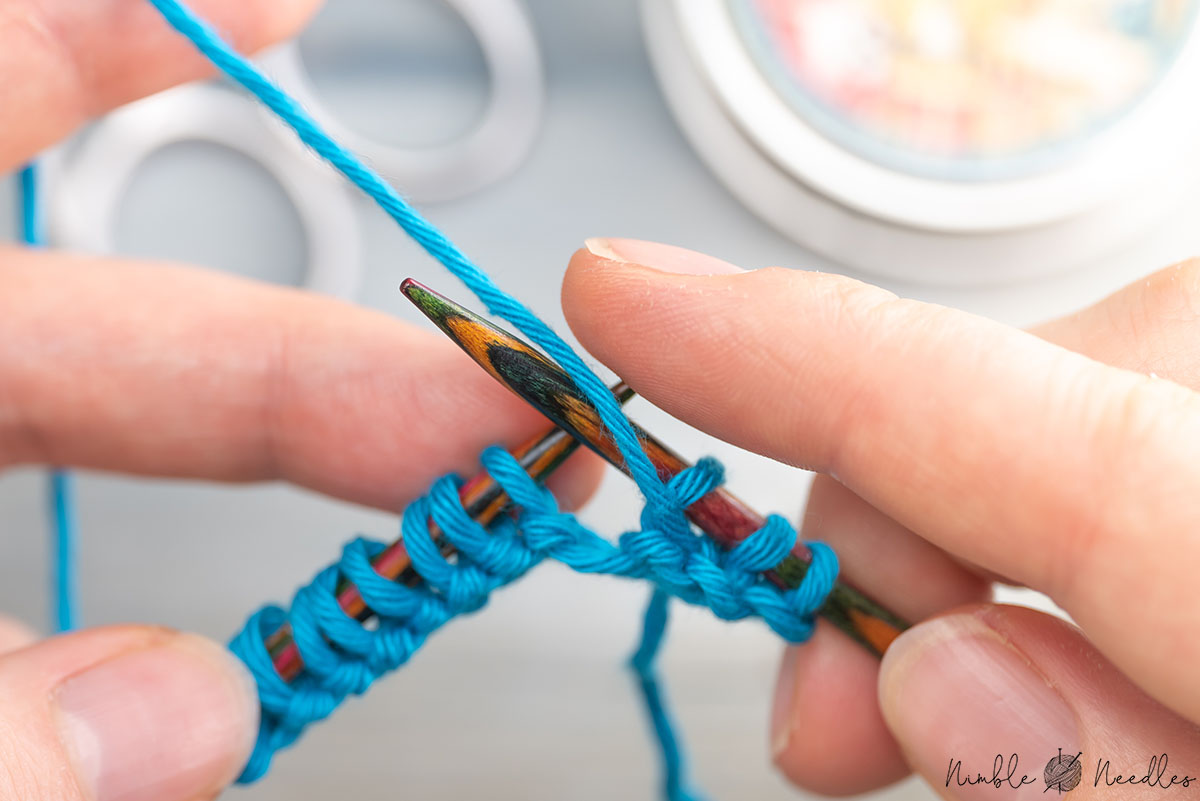
- Repeat steps 3-5 until the end of the row. Then, knit the last stitch through the back loop.
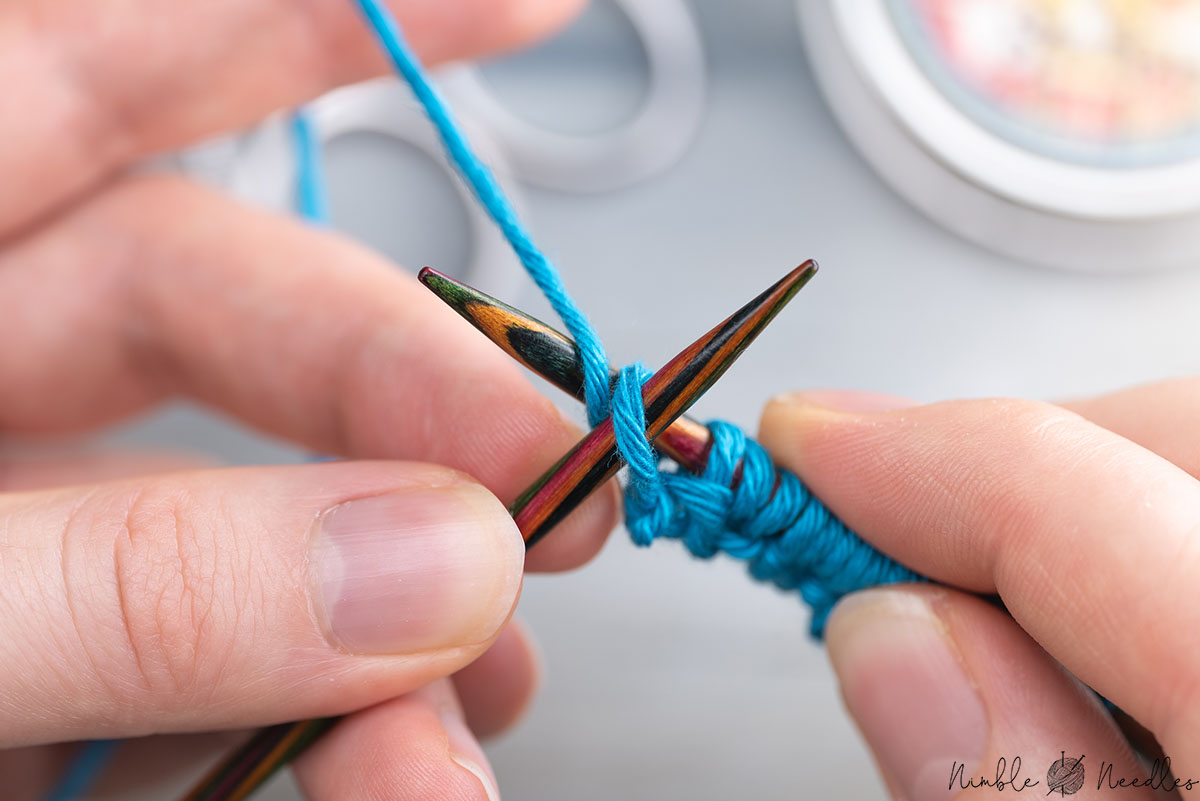
- In the second row, you start with the real brioche repeat. Slip the first stitch purlwise with yarn held in front. This is your selvage stitch for the wrong side.
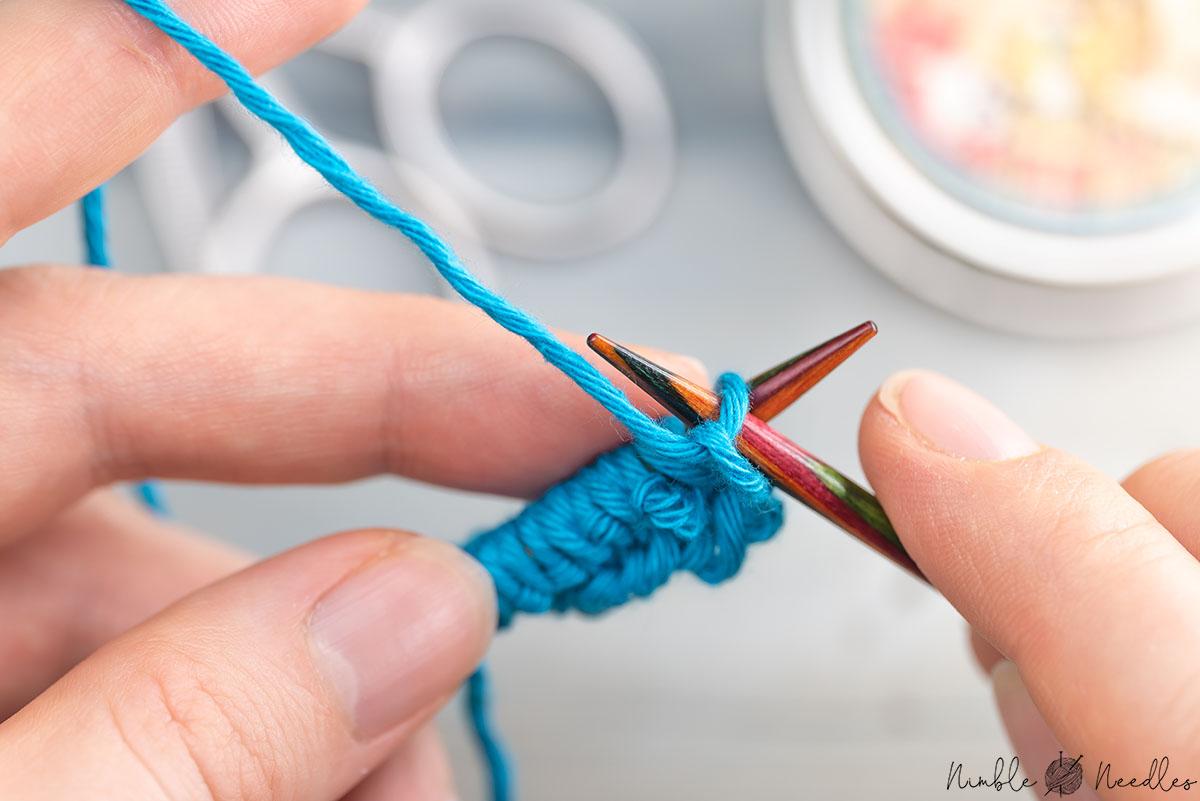
- Next, knit the double stitch together. This double stitch consists of your yarn over and the stitch you've slipped. Some tutorials with call this action a brioche knit (brk).
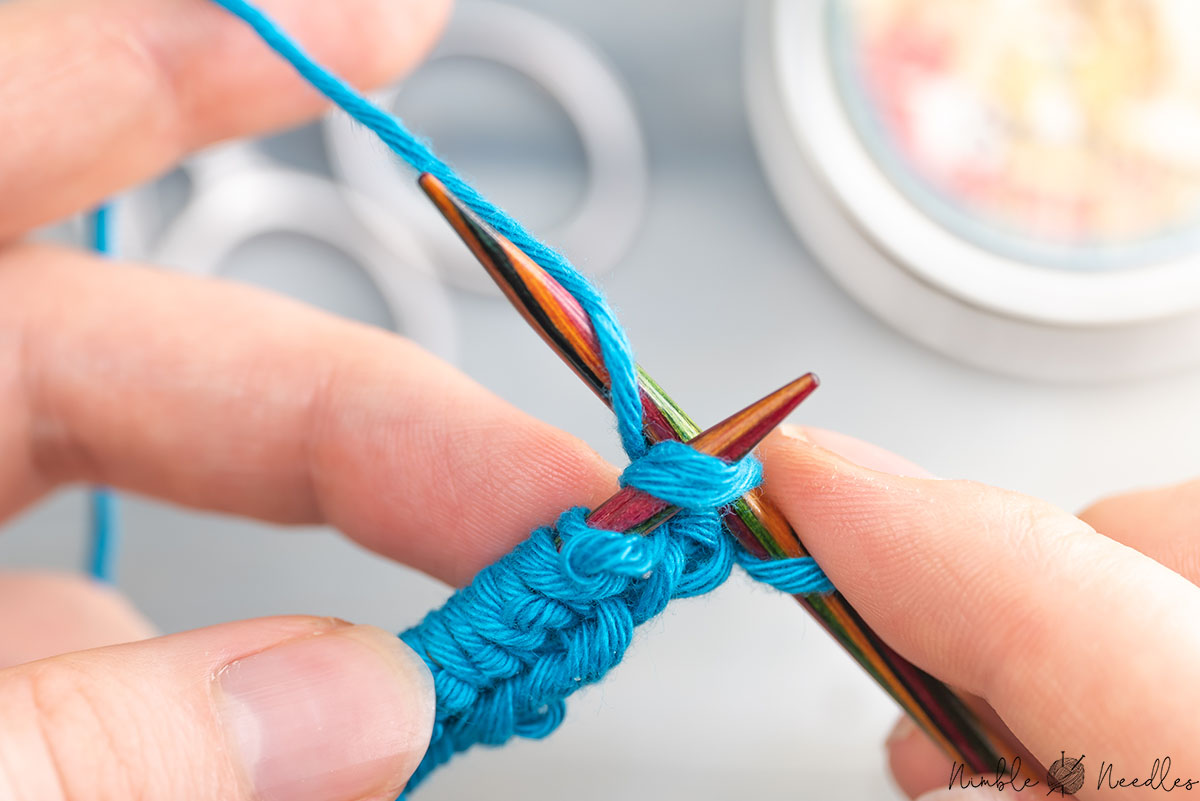
- Slip the next stitch purlwise with yarn held in front.
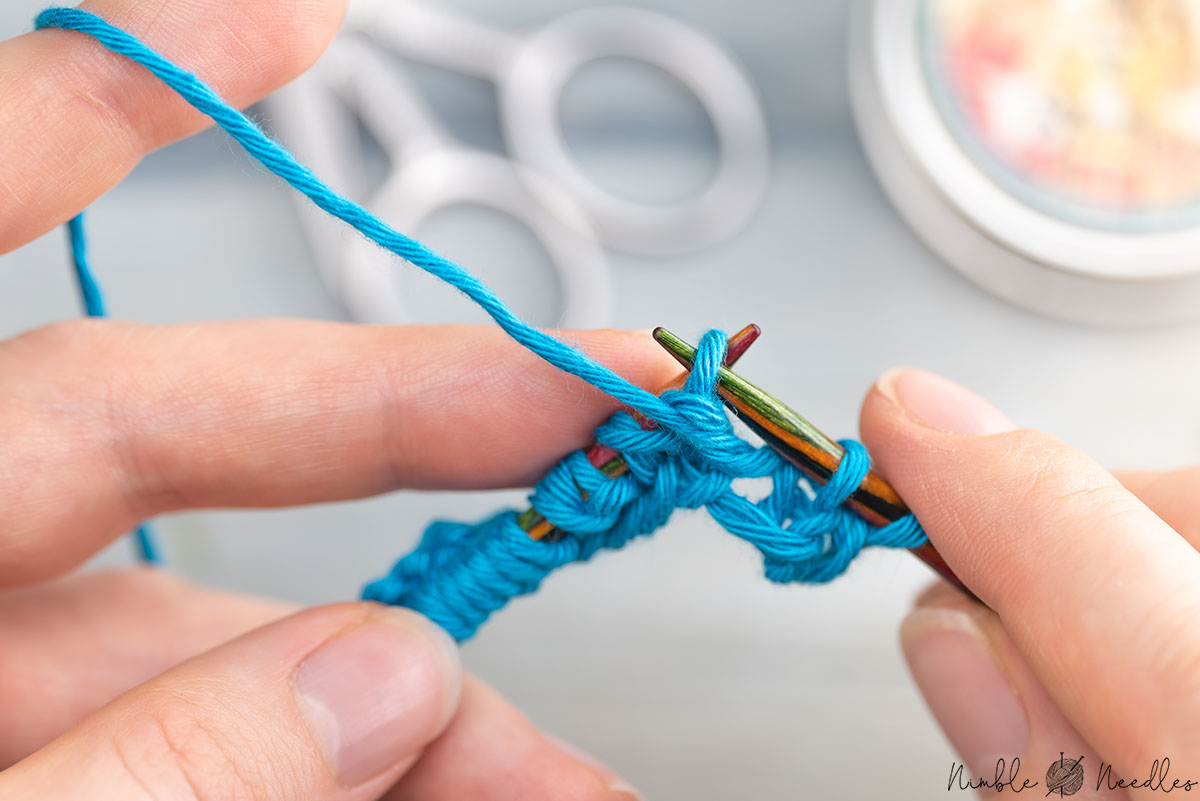
- Add a yarn over on top of that slipped stitch. A lot of patterns will group the sl1p wyif and the yarnover together and simply call it Sl1Yo or Sl1&yo.
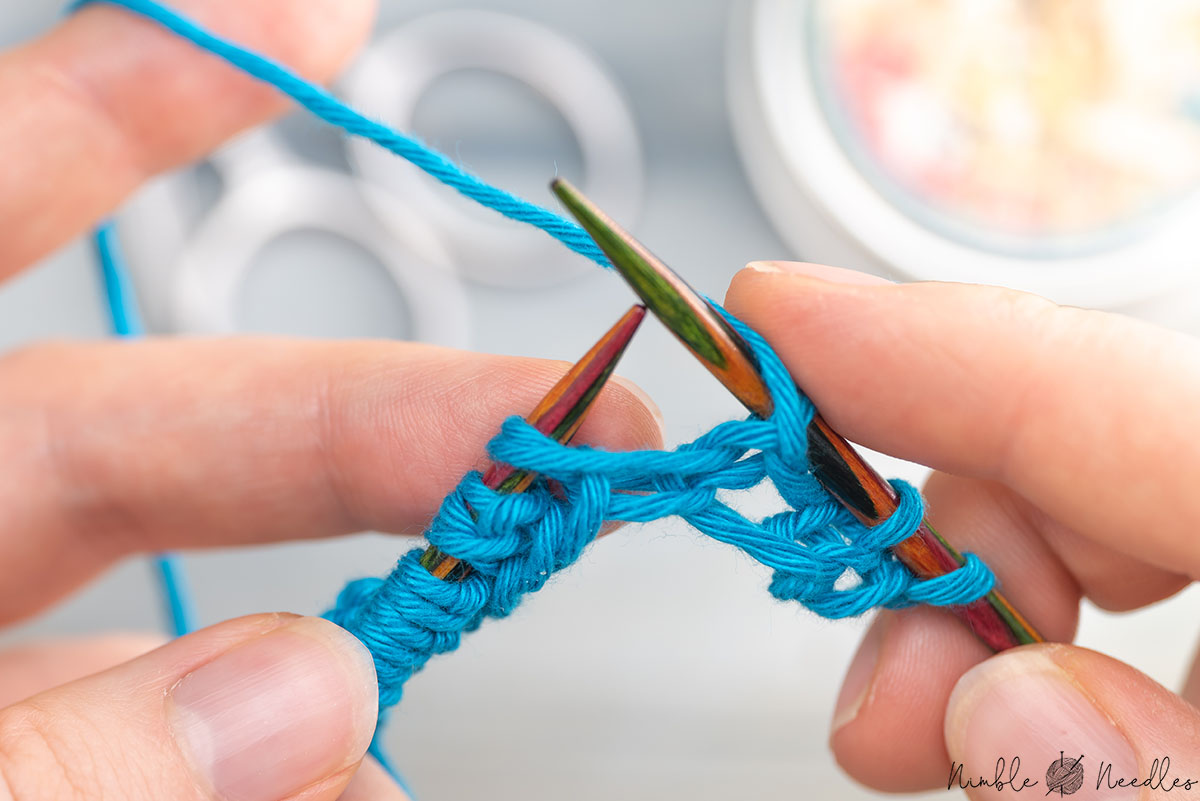
- Repeat steps 8-10 until the end of the row, then purl the last stitch.
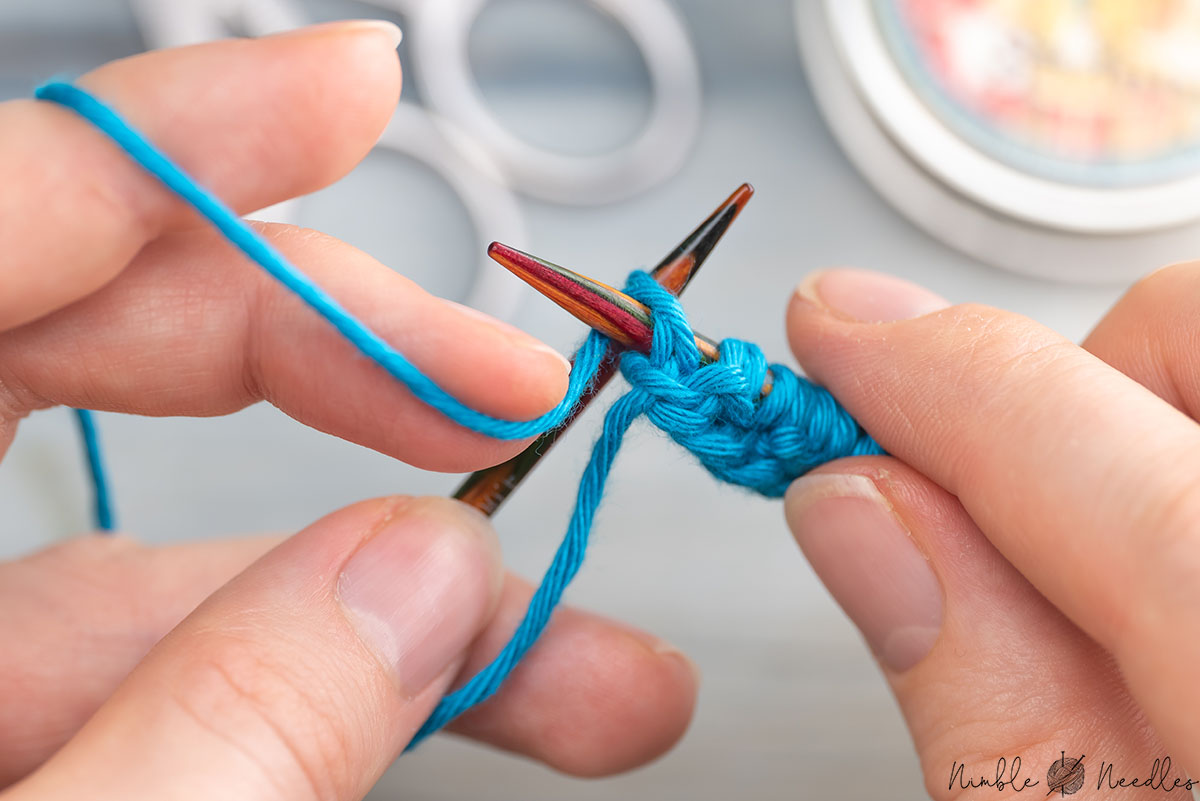
- Slip the first stitch of the third row with yarn held in back, and then continue the same repeat: R3: sl1p wyib *k2tog, sl1p wyif & yo*, ktbl
It helps if you read your knitting. Basically all you have to do is knitting the double stitches together and slipping all the "single" stitches while adding a yarn over.
- Repeat these last two rows over and over again for the brioche stitch.
R4: sl1p wyif *k2tog, sl1p wyif & yo*, p1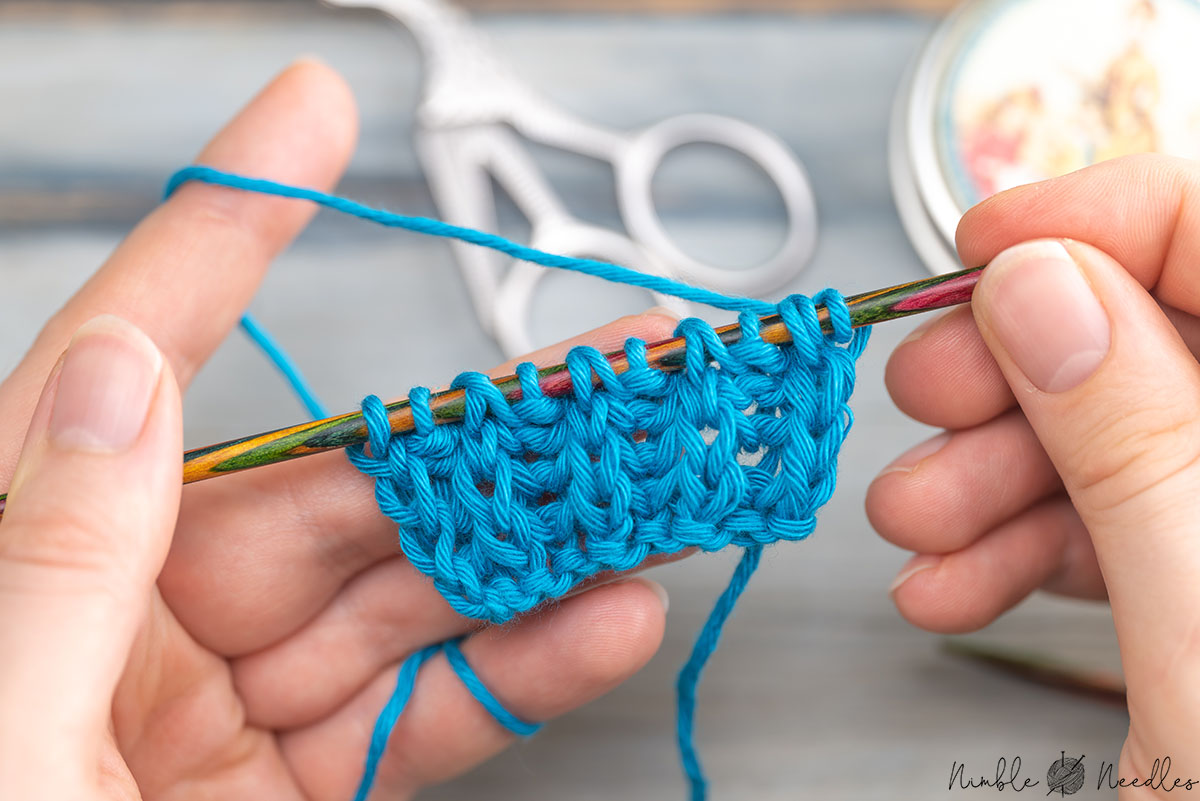
Notes
If you want to knit this extra fast, you can work the yarn over and the slip stitch at the same time. Simply bring the yarn to the front of the work and then slip the stitch. Now bring the yarn to the back again and you'll have two loops on your right needle.
Another thing you should be aware of is that it takes a couple of rows (8-10) for the pattern to really show. So, don't worry if your work looks somewhat weird after the third row. That's normal.
Also kindly consider two things:
- You will need about 30-40% more wool than for a regular work of the same size.
- You are basically working increases in the first row through the yarn overs. Your work will be significantly wider than a similar piece in stockinette stitch with the same number of cast-on stitches. A stretchier cast-on is often recommended.
Brioche Stitch with an uneven number of stitches
You can also knit this pattern with an uneven number of stitches; in this case, you have a 2-row repeat like this.
- Row 1: SL1p wyib, *sl1p wyf, yo, k2tog*, sl1p wyif, yo k1tbl
- Row 2: SL1p wyif, *k2tog, sl1p wyif, yo *, k2tog, p1
Repeat those two rows until the end of your work. In reality, you just have to k2tog all double stitches and sl1&yo all single stitches. So, it’s not a big difference really.
Advantage of this repeat: The result will be symmetrical edges on both sides.
How to knit Brioche Stitch into the row below
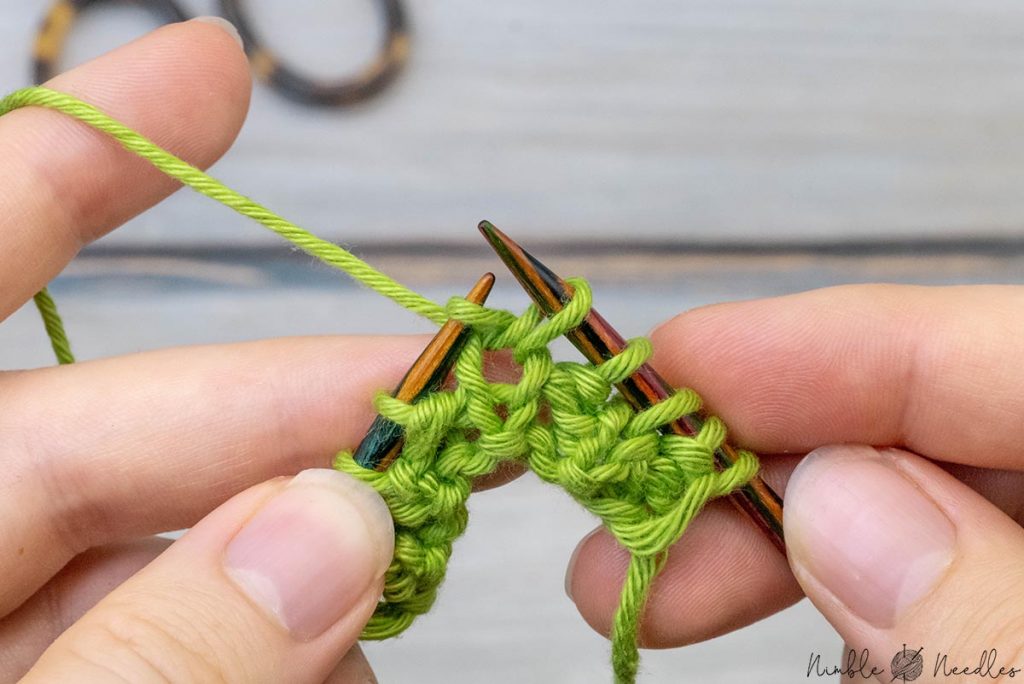
Instead of the yarn overs, you can also knit the brioche stitches into the row below. This method is often called the fisherman’s rib stitch, and some knitters find it a bit easier to knit.
Here’s the repeat
- Cast on an uneven number of stitches
- Preparation: Sl1p wyif, *p1, k1*, p2
- Row 1: SL1p wyib, *k1 below, p1*, k1 below, k1
- Row 2: SL1p wyif, *p1, k1 below*, p2
Repeat rows 2+3 until the end.
This will often look a bit wonky before you stretch it out because the stitches that you unravel as you knit below need to settle into the fabric first.
Structurally, the Brioche Stitch and Fisherman’s rib stitch are exactly the same. There is quite some misinformation around on the internet. Appart from differences in your personal tension, the resulting fabric will be identical.
The best selvage stitches for the Brioche Stitch
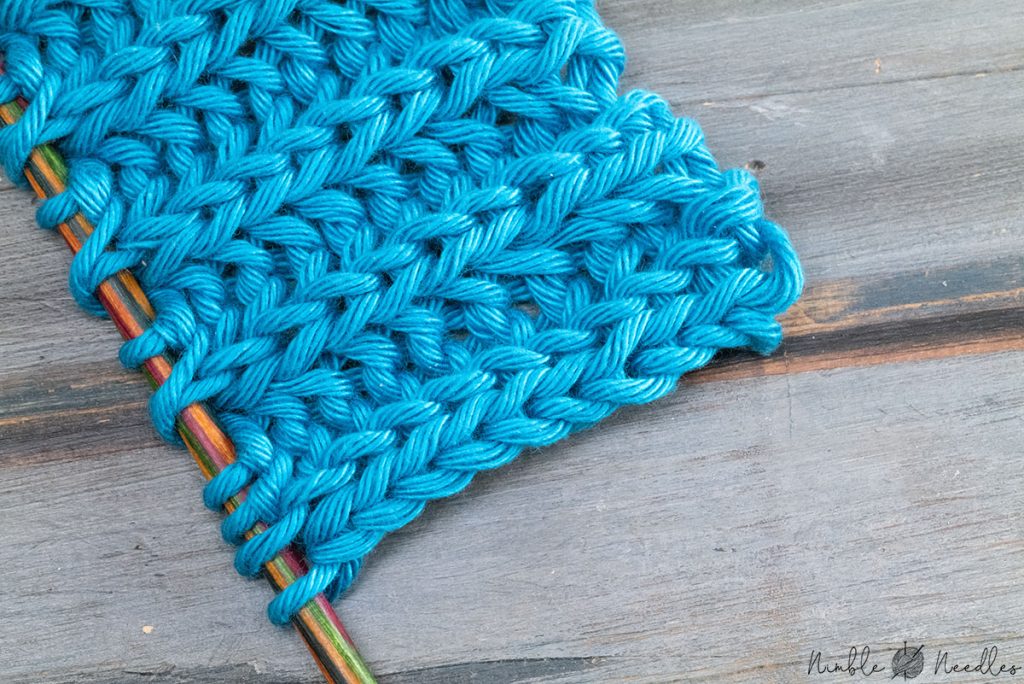
#1 Double stockinette stitch selvage
One of the biggest issues in brioche knitting is the edge stitches. The slip-stitch selvage I showed you so far looks reasonably nice but far from perfect. If you plan to knit a scarf or shawl in the brioche stitch, I recommend adding a proper 3-stitch selvage and using an odd number of stitches as a base for symmetrical edges:
- Even-numbered rows: k1, sl1p wiyf, k1, *sl1yo, k2tog*, sl1yo, k1, sl1p wiyf, k1
- Odd-numbered rows: sl1p wiyf, k1, sl1p wiyf, *k2tog, sl1yo*, k2tog, sl1p wiyf, k1, sl1p wiyf
After the second row, you can basically knit the stitches as they appear. You knit every knit stitch, and you slip every purl stitch with the yarn in front. This gives a very neat & round edge in double stockinette stitch.
Good for: Scarfs, shawls, and other reversible projects in one color
#2 Garter Stitch selvage
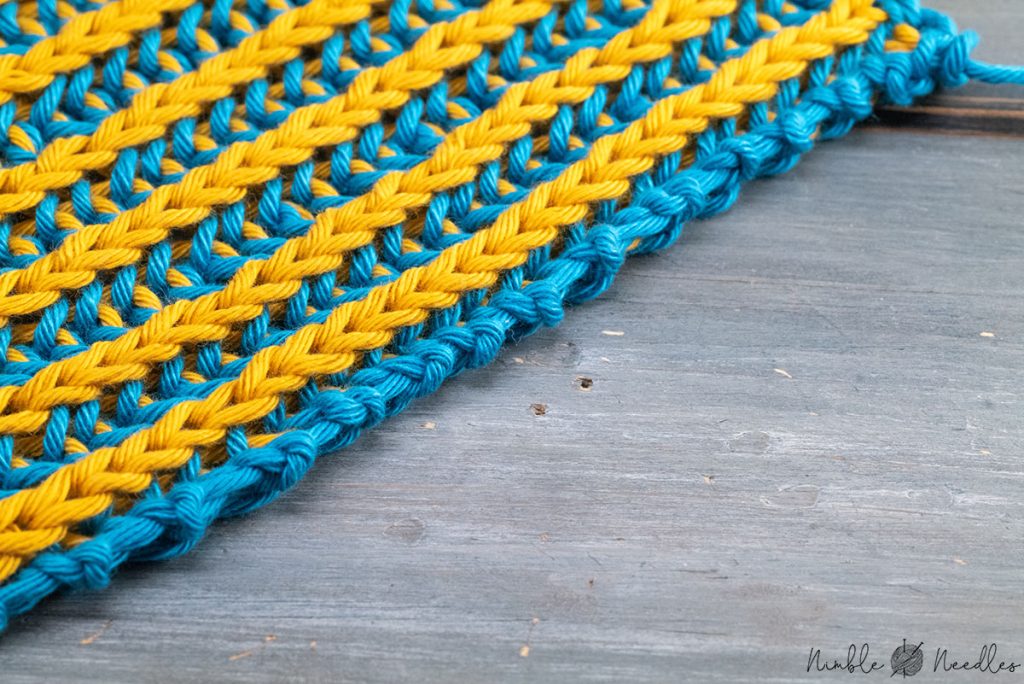
Another very versatile edge for the brioche stitch is the garter stitch selvage. Basically, you simply knit the first and last stitch of every row.
- Even-numbered rows: k1, *sl1yo, k2tog*, sl1yo, k1
- Odd-numbered rows: k1, *k2tog, sl1yo*, k2tog, k1
If you are working in two colors, then I recommend knitting these selvage stitches only with the main color (see below). The resulting edge may not look as perfect and invisible but it’s very sturdy and ideal for seaming. Join two garter stitch edges with a mattress stitch, and the resulting seam will be almost invisible (here’s how I seam brioche knitting).
Good for: Seaming and projects in two colors.
How to increase and decrease Brioche stitch

It’s fairly easy to work an increase with a brioche stitch pattern. You only have to remember that you work the increases through the double stitches.
- So, knit until you reach one of the double stitches you would normally k2tog/brk.
- Knit through the double stitch like you normally would, but DON’T slip it off your needle yet.
- Instead, yarn over once and then knit 1 again into the same stitch. Done.
- Now, you have another brioche stitch combination for the next row. You only have to take care that you cannot k2tog the middle stitch yet. Simply knit it.
Note: If you are knitting into the row below, you work it the same way (so knitting the row below twice with a yarn over in between). The only difference is that on the return row, you have to knit the yarn over as a regular knit stitch (there is no row below, obviously).
Here’s a more detailed tutorial on how to increase the brioche stitch that also covers increasing in the round and in two colors. And here’s a tutorial for advanced knitters who would like to know about reversible brioche increases.

The decreases are a bit more complicated, as you have to think in left- and right-leaning variations. But if you knit them in two colors, you can achieve some pretty fantastic effects. Here’s everything you need to know about basic brioche decreases.
If you are daring enough, you can even try to create the brioche double decrease (br4st dec) for some even more stunning structures that will behave almost like the cable stitch.
Half Brioche Stitch

A very interesting variation is the half brioche stitch. It’s less bulky than the “full” brioche stitch. Basically, it boils down to only knitting one row in the brioche stitch, and in the return row you knit all stitches as they appear:
- Row 1: K1, *sl1p, yo, k1*, k1
- Row 2: P1, *p1, K2tog*, p1
There’s an easy way to memorize this: Purl all single stitches and knit all double stitches together. In the next row, yarn over all purl stitches and knit all knit stitches.

The half brioche stitch has two different sides. I personally think they are both pretty, so I wouldn’t call it a wrong and a right side. But you might have to decide which side will be the front of your work. A standard stockinette selvage works fine with this stitch (so k1 in the first row and p1 on the return row).
Read my full tutorial on how to knit the half-brioche stitch here.
2-Colored Brioche Stitch

Another variation you really should try once is the 2-color brioche stitch. I know, 2 colors might sound scary for a beginner, but there’s no need to be afraid!
Why? Your work will show a different (dominant) color from each side and you don’t have to knit with two colors at once. Instead, you work each row twice (but each time in a different color). It’s really easy.
Note: You will need double-pointed needles for the 2-color brioche stitch. Circular needles work as well, but it’s bit more complicated as you will have to slide the work back and forth between the two ends all the time.
Here’s how to do the 2-colored brioche stitch:
Cast on an uneven number of stitches in yarn A (Main color). If you cast on purlwise, the edge will look a bit more in pattern.
- Preparation row (yarn A): k1, *sl1yo, k1*, sl1yo k1
- Slide the work back to the other end and join in yarn B
- Row 1a (yarn B): sl1, *p2tog, sl1yo*, p2tog, sl1
- Row 1b (yarn A): k1, *sl1yo, p2tog*, sl1yo, k1
- Slide the work to the other end
- Row 2a: (yarn B): sl1, *k2tog, sl1yo*, k2tog, sl1
- Row 2b: (yarn A): k1,*sl1yo, k2tog*, sl1yo, k1
- Slide the work to the other end
- Repeat rows 1a-2b until you reach the desired length.
Basically, you work each row twice. Once with each color. And you work all the stitches as they appear. If the double stitch has a little bump at its base, you purl it togther. If the double stitch has a little V at its base, you knit it together. Only the first two rows are a bit tricky as it’s still a bit hard to see the difference between a purl and a knit double stitch. But once the ribs are fully formed, it’s incredibly easy.
>> You will find my full tutorial on the 2-colored brioche stitch here
Please note: Some patterns will call the purling together of a double stitch “brp” or “brioche purl”.
How to bind off the brioche stitch
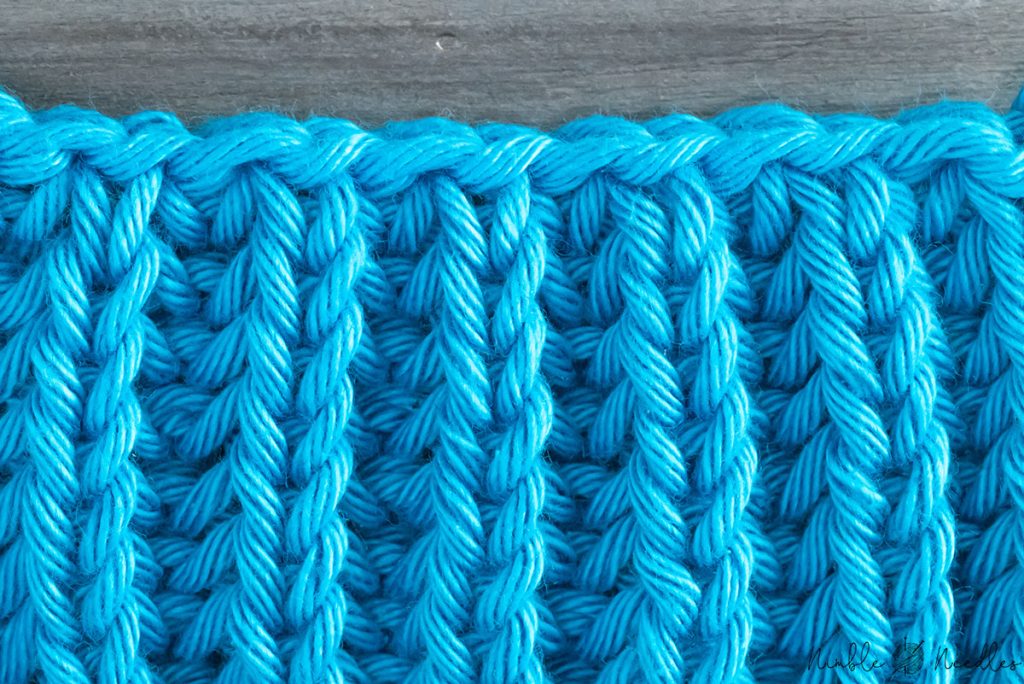
You can bind off the brioche stitch with the regular bind-off. Just remember three things:
- Bind off the stitches in pattern. Knit all knit stitches (all stitches with a V at their base) and purl all stitches (all stitches with a little bump at their base).
- Do not add any yarn overs anymore.
- Try to cast off as loosely as possible. Using a needle one or two sizes larger is recommended.
If you want to see a video and three other bind-off variations, I have a full tutorial on how to bind off the brioche stitch here.
How to knit the brioche stitch in the round
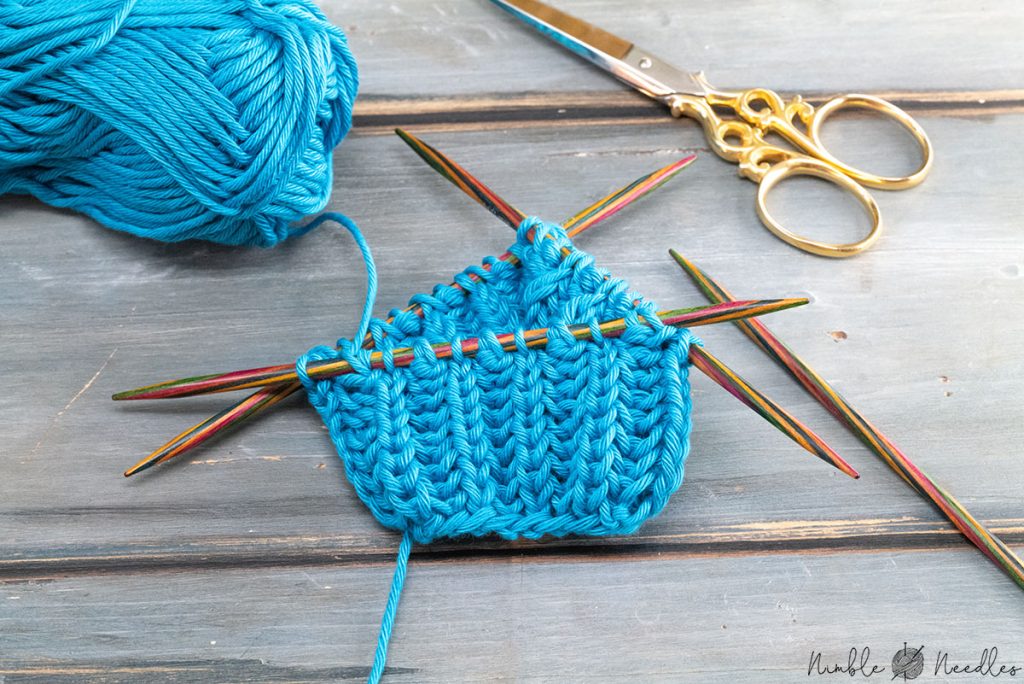
Normally, the brioche stitch is a one row repeat. Your knit all double stitches together, and you slip the single stitches while adding a yarn over. Think of it like this: The brioche stitch is just a variation of double knitting and you have to knit each row twice. In the first pass, you knit the front side, and slip all stitches for the back side. In the second pass, you turn around (you are now on the backside), and knit the stitches of the backside while slipping all stitches of the front side.
If you want to do brioche knitting in the round, you need to keep that in mind because you cannot turn your project around anymore. You will still have to knit each row twice but in the second pass, you have to work the stitches for the backside from the front. This means you have to purl them!
- Cast on an even number of stitches
- Round 1 (preparation): *k1, sl1yo*
- Round 2: *sl1yo, p2tog*
- Round 3: *k2tog, sl1yo*
- Continue switching between these two round until you’ve reached the desired length.
In two colors, the repeat is actually exactly the same. You simply always knit round 2 with the contrast color and round two with the main color. So, that’s actually a bit easier in the round since you do not really have to pay attention whether you need to purl or knit a double stitch-together.
Brioche stitch edge

It’s also possible to knit a 3-stitch brioche stitch selvage.
- Row 1 (setup): Sl1pwyif, yo…
- Row 2: Sl1pwyif, yo, …, p2tog
- Row 3: Sl1pwyif, yo, …, k2tog
- Repeat rows 2+3
It creates quite the fluffy and neat little selvage. So, definitely an option you need to consider. Read my full tutorial on the best edge stitches here.
Fixing a mistake in brioche knitting
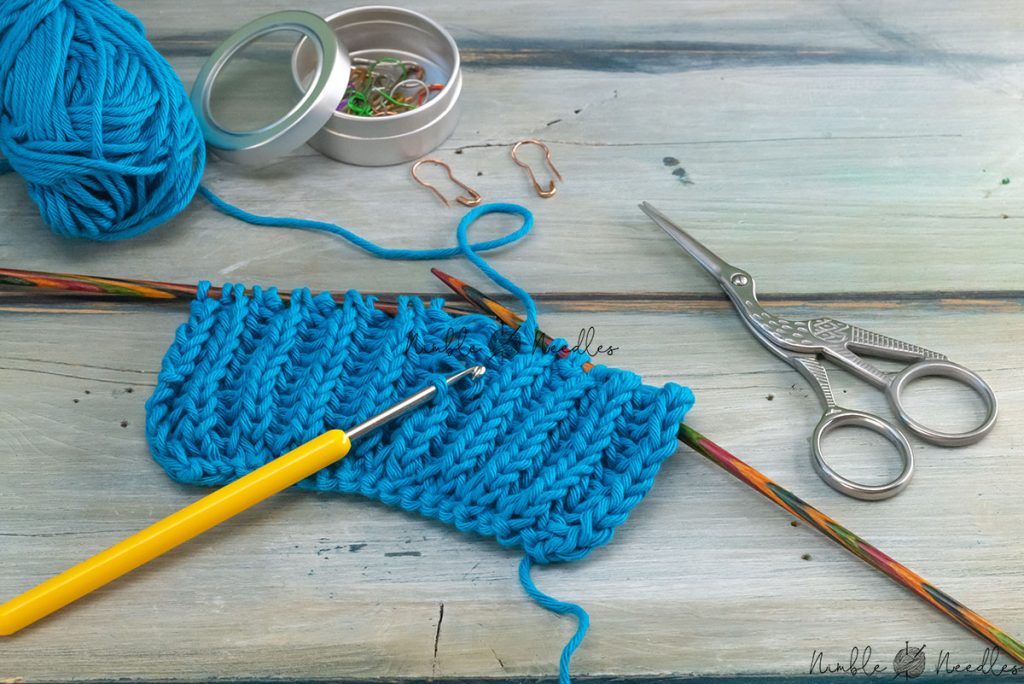
What happens when you drop a stitch? Do you need to unravel? Actually you don’t. You can easily pick up such a mistake with a crochet hook and “ladder” up. It’s a bit more difficult than in normal flat knitting, but it’s entirely doable.
>> Here’s how to fix brioche mistakes
So that’s how you knit the brioche stitch. Feel free to comment if you are still struggling with this stitch!

Hi, Norman,
I’m starting to knit a shawl with the brioche stitch. Your tutorials are excellent, thank you! However, I still don’t understand your 3-stitch brioche stitch selvage, i.e. I don’t understand how to knit a Sl1pwyif. Please, could you explain more detailed? Thank you so much!
you slip 1 purlwise with yarn in front. Bring the working yarn to the front of your work, then enter the next stitch from right to left (as if to purl, hence purlwise) and slip it to the right needle without knitting.
Thanks a lot! My shawl is already succesfully one meter long and is still increasing … Best wishes,
Marjana
Hi Norman,
I have stumbled upon your site only recently, looking for finger gloves patterns, and I have been using it as my favourite reference ever since. I love it how you systematically explain every step of the knitting process. I’ve shared this site with the other members of a knitting circle and they loved it too. Keep up the great work!
I’ve only heard of brioche knitting a couple of months ago, but I’ve been in love with it ever since. I can’t seem to be able to knit anything else.
What I’ve been unsucessfully looking for is a way to knit an i-cord selvedge with a two-colour brioche stitch. Could you help me out?
I love i-cord selvedges (I’ve first heard of them on your site – huge thanks!) because they make for a fully reversible final product.
For single-colour I use this pattern, but I can’t seem to make it work with two-colour:
RS: slip one with yarn in back, purl one with yarn in front, knit one … knit one, purl one with yarn in front, purl one
WS: slip one with yarn in back, knit one, purl one with yarn in front … purl one with yarn in front, knit one, purl one
There is no easy solution here because that slipping doesn’t work when you mix two colors. You could try to knit it in one color (kind of like Intarsia). Other than that, I’d have to really do some tests and I’m currently too busy.
But I’ll keep it in the back of my mind, danielle.
Thank you for the great idea and the quick reply! Makes sense – I could treat the second colour and the i-cord edges as three “separate” intarsia pieces and hide the crossed threads within the i-cord.
This is a great tutorial for beginners! I’m a beginner knitter and this was really helpful.
How do I pick up the loops — all of them — when I have mad3 a mistake. I saw a video once that showed how, but I can’t find it now.
i am not sure I understand your quesstion? do you want to know how to pick up stitches or how to fix mistakes?
Do you happen to know the name if that green yarn pictured in this tutorial?
Catania Grande in lime, I believe
I made a sweater (Eden) in brioche with linen. I washed it and it got bigger, especially in front where it overlaps and ties on one side. Can I block it to shape it back?
hm..very doubtful. Some people will say they washed it at higher temperatures to shrink it..but that can be very dangerous.
How do you knit two color brioche in the round? Or is it better to knit it flat and sew it together when done?
Norman – thank you for introducing me to knitting! I’ve been knitting near daily for about a month now and have made some great coasters and mug cozies. Your tutorials are comprehensive and educational, and the videos are high-quality – you clearly take a lot of time to teach us.
I’m stumped on one part of this pattern (I’m following the step-by-step basic brioche directions at the top of this post).
Step 2 says “K1, *yarn over purlwise, slip 1 purlwise, k1*, K1” so at the end of the preparation row, there are 2 knit stitches after the YO and SL1P
Step 3 says to knit one stitch then knit the YO and SL1P together, but there’s another stitch before I get to those, so am I supposed to knit twice before k2tog the YO and SL1P from the prior row?
Thank you for your help!
there was a mistake there in the instructions, yes. I fixed things and added a video to clear up any remaining confusion. Thank you for reading my article so diligent.
Norman, your explanations and videos are so clear, but I’m still struggling to join the front and back of my garment to carry on knitting in the round. I lose the pattern at the joins! please show me how to get this right
I have been avoiding brioche for years because I never quite understood it. This is the best explanation! Your pictures are so helpful and your descriptions are perfect. Thank you!!!
Hi Norman – thank you for sharing your vast knitting knowledge! I appreciate the analysis you provide on the structure of the various stitches; it helps my engineering brain make sense of what I’m doing.
What would be your suggestion for the best way to join yarn in brioche? I’m knitting a squishy baby blanket with acrylic for easy care. The Russian join doesn’t seem to want to stay tidy and the extra bulk of the doubled yarn is pretty noticeable in the field of stitches. Is magic knot the way to go? It seems like you’d feel that bump in such a squishy fabric. I also don’t quite know how to weave in ends on something that doesn’t have a wrong side to hide it in.
Any advice you might have is much h appreciated!
-Megan
Well, if it’s pure acrlyic, you could try fusing your rusian join with a bit of heat veeeery carefully. But that would be my first bet. You could also use this variation: https://nimble-needles.com/stitches/the-trim-overlap-felt-join/
Thank you so much Norman, I’ll give that a try!
hi dear norman, recently i’ve seen a hat that knitted in honey comb brioche, but the back of the hat was in normal brioche. how it’s possible?! at the same time, honey comb and simple brioche in one garment. i wish i could send the picture!
What is k1tbl???
knit one through the back loop
Something’s wrong here. I’ve tried this twice, following directions exactly, and it’s not coming out right. Moving on. Thanks for trying.
there is a video attached to this post where I show you exactly what I do. The first couple of rows will look “wrong”, and I suspect that’s what is throwing you off. the pattern will only emerge after 6-8 rows.
Thanks for all your super clear videos!
I have a problem – I’m knitting a swatch of two-colour brioche in the round (20 brioche stitches around) and I’m finding that the whole pattern is leaning significantly towards the right all the way around the tube, most extremely over the first ~10 rows, but continuing to lean up 20+ rows so far. I’m knitting English style and I used a long-tail cast-on around two needles before adding the second colour. Any ideas what I’m doing wrong?
That sounds like bias and is typically created by the twist stored in your yarn, the way you wound the skein/ball/yarncake & unwind it as you knit, and possibly your unique knitting style. Hard to tell from afar which of these factor(s) comes into play there but this would be my starting point.
Aha, that could definitely be the case – one of the two colours is indeed very tightly wound in a small ball from a long time ago and it has been twisting around a lot as I knit. Thank you so much for the advice! 🙏
Thank you for such a clear tutorial, this was very helpful, and I’ve made great progress on my project thanks to following your descriptions.
I’m knitting a two-colour brioche shawl band on a shawl and I’ve lot track of which pair of rows is next. Do you have any tips on how to read the knitting when counting rows?
well, every V of your little brioche column stands for 2 rows of brioche stitch knitted. that’S how you can count it.
I understand and am not asking for help with the pattern but have a general question about the brioche stitch.
I am to the point of sewing the pieces together for a sweater I just finished knitting. I thought it was knit using Brioche Rib worked in the round. But, after reading through your Brioche how-to, I’m not so sure.
Rnd 1: *P1, sl1yo, p1; rep from * to end.
Rnd 2: *P1, brk, p1; rep from * to end.
Rep Rnds 1 and 2 for pat.
Following the instructions, I wind up with 2 purl stitches between each of the brioche stitches rather than just 1.
Was the pattern just a different brioche stitch?
Thank you for your time and your site is very useful.
yeah, that’s sounds like a variation of a brioche stitch.